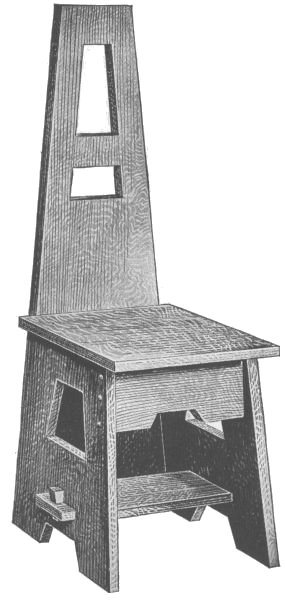
Apple Peeler Review

Apple peeler review - Very fast and easy!! Peels apples skin without making a mess in 10-15 millisecond!

Apple's skins from Apple peeler machine.
After peel skin with Apple peeler.

What's the best hot tub?

If you are looking for hot tub for your home. You may need to do research a lot about hot tubs. And I done that before. Hundred of stores, thousand of reviews. The one that you like and the price that you acceptable.

How much budget do you have? You can get a hot tub for low price or you want the one that will last for long. Would you like to pay a bit more expensive and get the better one?

Aura 29 Jet 120 Volt Interior Plug and Play Operation Hot Tub is 5 stars rating from customers in Amazon.com.

Why you need to consider about Aura 29 Jet 120 Volt Interior Plug and Play Operation Hot Tub?

  • Relaxing hot tub for your home with 29 jets; one lounge and four seats.
  • Easy to set up and operate with no special wiring or plumbing necessary. 
  • 29 therapy jets including two neck jets.
  • Includes cover; ozone compatible.
  • Holds 265 gallons; measures 77 x 77 x 34 inches (WxDxH).
Aura 29 Jet 120 Volt Interior Plug and Play Operation Hot Tub with Hard Cover
Aura 29 Jet 120 Volt Interior Plug and Play Operation Hot Tub

The Aura 29-jet hot tub in white


HOW TO MAKE HALL CHAIR


  • This hall chair is designed to take up as little room as possible. For its construction the following stock will be needed:
    • 1 back, 7/8 by 14 by 44 in., S-2-S.
    • 2 sides, 7/8 by 14 by 17 in., S-2-S.
    • 1 seat, 7/8 by 14 by 14 in., S-2-S.
    • 1 stretcher, 7/8 by 6 by 16 in., S-2-S.
    • 1 brace, 7/8 by 5 by 11 in., S-2-S.
    • 1 piece, 7/8 by 7/8 by 44 in., for cleats.
    These dimensions are for finished pieces, therefore 1/4 in. should be allowed for planing if the stock cannot be secured finished.
    Lay out and cut the design on the back, sides, and brace. To cut the openings, first bore a hole near one corner to get the blade of a coping saw through and proceed to saw to the lines. Smooth the edges after sawing by taking a thin shaving with a sharp chisel. A file will not leave a good surface.
    Mark the tenons on the ends of the stretcher and cut them with a backsaw and make smooth with a chisel. From the tenons mark the mortises in the sides through which they are to pass.
    Detail of the Hall Chair
    Complete Hall Chair in Plain Oak
    To cut these mortises, first bore a row of holes with a 5/8 in. bit, boring halfway from each side so as not to split off any pieces. Now make of scrap material the two keys and from them mark the small mortises in the tenons.
    Before putting the chair together, the cleats for holding the seat should be fastened to the sides, back and brace. Use flat-head screws for this purpose. Then put the sides and stretcher together, and fasten the back to the sides with flat-head screws.
    The brace should be put in next, using three round-head screws in each end. There only remains the top, which is held by screws through the cleats from the under side.
    Stain with two coats of weathered or mission-oak stain, and then apply a thin coat of "under-lac" or shellac and two coats of wax.
    Nantucket Weathered Wood Table

    Nantucket Weathered Wood Table


HOW TO MAKE LAWN SWING

The coming of spring and summer calls forth various kinds of porch and lawn furniture. A porch or lawn swing to accommodate two or more persons is a thing desired by most people. The lawn swing as shown in the picture is portable and does not need stakes to hold it to the ground. While this swing is substantial and rigid it can be moved from place to place on the lawn, or the chains can be fastened with heavy hooks to the ceiling of a porch instead of using the stand. Either ropes or chains may be used to hang the swing and should be of such length that the seat will be about 20 in. from the ground or floor.

The drawing giving the dimensions for constructing the seat shows how the parts are put together. The front and back apron pieces are mortised to receive a 1-in. square tenon cut on the crosspieces that support the slats. Each end of the apron pieces extends 4 in., and a hole is bored at A into which the hanging ropes or chains are fastened. If ropes are used, bore the holes to fit the rope and when the end of each rope is put through a hole it is tied in a knot to keep from slipping out. Chains can be fastened with eye bolts. Small carriage or stove bolts are used to hold the slats on the framework and cross pieces. The arm rests are fastened with wood screws.
HOW TO MAKE LAWN SWING
The drawing for the stand gives all the dimensions for its construction. Split the upright pieces or legs with a saw cut to the length as shown. A bolt should be put through each piece edgewise at the end of the saw cut, to keep the wood from splitting any farther when the ends are spread to receive the bolts through the cross pieces at the top. The upper ends of the ropes or chains are fastened close to and under the bolt holding the inside forks of the uprights. This bolt can be long enough[49] to fasten a clevis that will hang underneath for this purpose. The whole swing can be painted with a forest green color which is very suitable for summer outdoor furniture.
how to make lawn swing
Showing Construction of Stand

Living Accents 3 Person Canopy Swing

Great Jig Saw for DIY.

Now, you know how to make furnitures and you will need several tools for your DIY. Black & Decker JS660 Jig Saw with Smart Select Dial, great jig saw for beginner and DIY job.
Great Jig Saw for DIY.
Black & Decker’s JS660 jig saw has a SmartSelect dial that automatically sets optimal orbital settings, with seven helpful pre-programmed settings. These, combined with the saw’s other features, make it ideal for cutting wood, metal, and plastic and for making straight and curved cuts.

Here are some of customer feedback on Black & Decker’s JS660 jig saw  :
“ This mid-low priced jigsaw has cut holes in 1/2" pine wood like butter...get the right blades for every tool/project! ” PenName | 2 reviewers made a similar statement

“ Really happy with it as a homeowner - does what I need done. ” A. Eric Brewington | 4 reviewers made a similar statement

“ I've had this saw for about a year now and absolutely love it. ” Anthony D. | 2 reviewers made a similar statement
Jig Saw for beginner
Jig Saw for beginners

How to make a dresser


how to make a Dresser
Dresser in Quarter-Sawed Oak

The dresser shown in the illustration was made of quarter-sawed white oak and finished golden and waxed. The mirror is of beveled glass and the following is the stock bill:
  • 1 top, 3/4 by 19-1/2 by 33 in., S-2-S.
  • 4 posts, 1-3/4 by 1-3/4 by 28 in., S-4-S.
  • 4 end rails, 3/4 by 2-1/4 by 17 in., S-2-S.
  • 4 stiles, 3/4 by 2-1/2 by 20 in., S-2-S.
  • 2 panels, 3/16 by 12 by 18 in., S-2-S.
  • 3 facings, 3/4 by 2-1/4 by 29 in., S-2-S.
  • 2 top frame pieces, 3/4 by 2 by 32 in., S-2-S.
  • 2 top frame pieces, 3/4 by 2 by 19 in., S-2-S.
  • 2 mirror supports, 1 by 2 by 33 in., S-2-S.
  • 1 mirror support, 3/4 by 2-1/2 by 33 in., S-2-S.
  • 1 drawer front, 3/4 by 7-1/4 by 28 in., S-2-S.
  • 1 drawer front, 3/4 by 6-1/4 by 28 in., S-2-S.
  • 2 drawer fronts, 3/4 by 5-1/4 by 14 in., S-2-S.
  • 1 partition, 3/4 by 1 by 6 in.
  • 2 mirror-frame pieces, 3/4 by 2 by 40 in., S-2-S.
  • 2 mirror-frame pieces, 3/4 by 2 by 20 in., S-2-S.
The following material list may be of common stock and not quarter-sawed:
  • Mirror-backing pieces equivalent to 1/4 by 18-1/2 by 36 in., S-2-S.
  • 2 cleats, 3/4 by 2 by 10 in., S-4-S.
  • 4 drawer-support frame pieces, 3/4 by 2 by 29 in.
  • 7 drawer-support frame pieces, 3/4 by 2 by 15 in.
  • Slides taken from scrap stock, 3/4 by 1 by 15 in.
  • 3 back pieces, 3/4 by 2-1/4 by 28 in., S-2-S.
  • 2 back pieces, 1/4 by 8 by 28 in., S-2-S.
  • 8 drawer sides, 1/2 by 7-1/4 by 17 in., S-2-S.
  • 2 drawer backs, 3/8 by 7 by 27 in., S-2-S.
  • 2 drawer backs, 3/8 by 7 by 13 in., S-2-S.
  • 2 drawer bottoms, 3/8 by 15 by 27 in., S-2-S.
  • 2 drawer bottoms, 3/8 by 15 by 13 in., S-2-S.
In working up the various parts proceed in the usual manner. If not thoroughly familiar with the various tool processes involved, it will be necessary to investigate pieces of near-by furniture and to read up some good text dealing with the processes involved.
The exact size of the mirror is 18 by 36 in. and the frame should be rabbeted to correspond.
How to make a dresser
Detail of the Dresser
For a finish, a coat of paste filler colored so as to [103]give a rich golden brown should be applied first. Allow this to harden, after rubbing and polishing it in the usual manner, then apply a thin coat of shellac. Sand this lightly when hard, and over this apply a coat of orange shellac. Over the shellac put several coats of some good rubbing wax and polish each coat well. If a striking contrast is wanted for the medullary rays of the quartering, apply a golden-oak stain first. Sand this lightly, then apply a second coat diluted one-half with solvent and sand again lightly. Apply a thin coat of shellac, then, when dry, sand lightly and apply paste, and proceed as before.

HOW TO MAKE A PIANO BENCH

how to make Piano Bench
Piano Bench

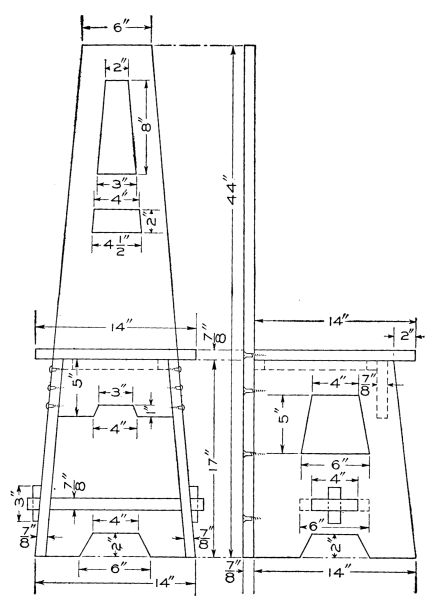
All the material used in the making of this piano bench is 1 in. thick, excepting the two rails, which are 7/8 in. thick. The bench can be made from any of the furniture woods, but the case may demand one made from mahogany. If so, this wood can be purchased from a piano factory. The following stock list of materials may be ordered from a mill, planed and sandpapered:
  • 1 top, 1 by 16 by 36-1/2 in.
  • 2 ends, 1 by 14 by 18 in.
  • 1 stretcher, 1 by 4 by 31-1/2 in.
  • 2 side rails, 7/8 by 4 by 29-1/2 in.
  • 2 keys, 1 by 1 by 3-1/2 in.
  • 6 cleats, 1 by 1 by 4 in.
The dimensions given, with the exception of the keys and cleats, are 1/2 in. longer than necessary for squaring up the ends.
The two rails are cut slanting from a point 1-1/2 in. from each end to the center, making them only 3 in. wide in the middle. The rails are "let into" the edges of the ends so the outside of the rails and end boards will be flush. The joints are put together with glue and screws. The cleats are fastened with screws to the inside of the rails and to the top. The stretcher has a tenon cut on each end which fits into a mortise cut in each end. The tenons will have sufficient length to cut the small mortise for the key.
How to make Piano Bench
Piano Bench Details
The kind of wood used will determine the color of the stain for the finish. This also depends on matching other pieces of furniture.
Ebony Leather Adjustable Artist Piano Bench

Ebony Leather Adjustable Artist Piano Bench